Courses
Courses for Kids
Free study material
Offline Centres
More
Store Icon
Store

NCERT Solutions for Class 6 Maths Chapter 8 Playing With Constructions Ex 8.4

ffImage
banner

NCERT Solutions for Class 6 Maths Exercise 8.4 Chapter 8 Playing with Constructions - FREE PDF Download

The NCERT Solutions for Class 6 Maths Chapter 8, Playing with Constructions, provides students with a comprehensive understanding of geometric constructions using a compass and ruler. Exercise 8.4 introduces essential techniques for constructing basic shapes, such as triangles and circles, fostering spatial awareness and problem-solving skills. These solutions are presented in a clear, step-by-step format, making it easy for students to follow along and master the concepts. These solutions match the CBSE Class 6 Maths Syllabus, offering clear explanations and step-by-step help to grasp basic concepts and build a solid foundation in recognising patterns.

toc-symbolTable of Content
toggle-arrow


You can download these NCERT Solutions for Maths Class 6 as a FREE PDF, making it simple for students to improve their problem-solving skills and get ready for exams. The solutions include useful tips and shortcuts, making studying more interesting and effective. With these resources, students can practise Playing with construction problems and prepare well for more advanced topics in maths.


Glance on NCERT Solutions Maths Chapter 8 Exercise 8.4 Class 6 | Vedantu

  • Exercise 8.4 encourages students to explore various properties of rectangles, including perimeter and area, enhancing their understanding of these shapes.

  • Each problem is explained in a clear, detailed manner, guiding students through the process of solving challenges related to rectangles.

  • The solutions are aligned with the CBSE Class 6 Maths syllabus, ensuring comprehensive coverage of essential concepts in geometry.

  • The exercise incorporates real-life scenarios where rectangles are used, helping students relate mathematical concepts to everyday situations.

  • Students can easily access the solutions in FREE PDF format, making it convenient for study and revision at any time.

Access NCERT Solutions for Maths Class 6 Chapter 8 - Playing with Constructions

Exercise 8.4

Question 1. Breaking Rectangles
Construct a rectangle that can be divided into 3 identical squares.


Constructing a rectangle that can be divided into 3 identical squares


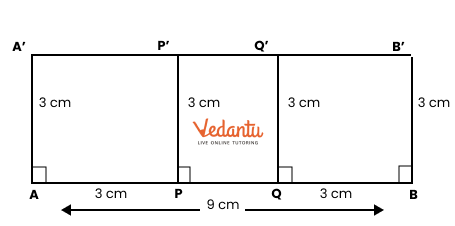
Solution: We shall draw a rectangle of the form shown in Fig. 1.


rectangle that can be divided into 3 identical squares


Step 1. Let us keep the vertical side of the rectangle to 3 cm. Since the rectangle is to be divided into three identical squares, the length of the rectangle must be 3 cm + 3 cm + 3 cm = 9 cm.


Step 2. Using a ruler, draw a line AB equal to 9 cm. (Fig. 2).


line of length 9cm


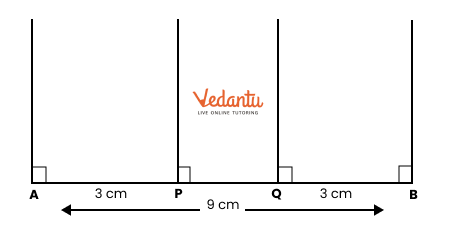
Step 3. Using a ruler, find points P and Q on AB such that AP = 3 cm and PQ = 3 cm. Here, QB is also 3 cm. (Fig. 3).


arcs of 3cm on the 9 cm line


Step 4. Using a protractor, draw perpendicular lines at A, P, Q, and B. (Fig. 4).

constructing rectangle divided into 3 identical squares


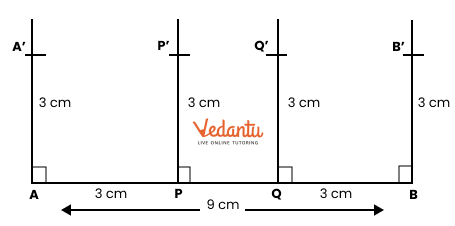
Step 5. Using a ruler, mark points A’, P’, Q’, and B’ on perpendiculars at A, P, Q, and B respectively such that AA’ = PP’ = QQ’ BR’ = 3 cm. (Fig. 5).


constructing rectangle divided into 3 identical squares


Step 6. Join A’ and P’, P’ and Q’, and Q’ and B’ using a ruler. Erase the lines above A’, P’, Q’, and B’. (Fig. 6).


rectangle divided into 3 identical squares


Step 7. ABB’A’ is the required rectangle which is divided into 3 identical squares APP’A’, PQQ’P’, and QBB’Q’.


Question 2. Give the lengths of the sides of a rectangle that cannot be divided into: (Page 201)
(i) Two identical squares
(ii) Three identical squares.
Solution:
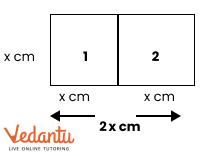
(i) Let the smaller side of a rectangle be x cm. If the larger side of the rectangle is 2x cm (x cm + x cm), then this rectangle can be divided into two identical squares of side x cm. (Fig. 1)


rectangle of slide of length 2x


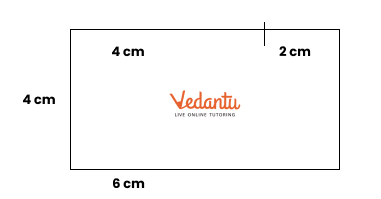
Let us consider a rectangle of sides 4 cm and 6 cm. Here, 6 is not equal to 8 (4 + 4), so, it cannot be divided into two identical squares as shown in Fig. 2


arc of length 4 cm and 2 cm


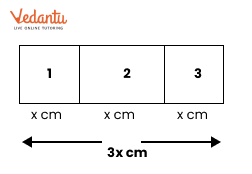
(ii) Let the smaller side of a rectangle be x cm. If the larger side of the rectangle is 3x cm (x cm + x cm + x cm), then this rectangle can be divided into three identical squares of side x cm. (Fig. 3)


rectangle of side 3x


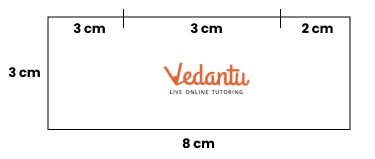
Let us consider a rectangle of sides 3 cm and 8 cm. Here, 8 is not equal to 9 (3 + 3 + 3), so, it cannot be divided into three identical squares as shown in Fig. 4.


arcs of length 3 cm and 2 cm on the rectangle


Figure it Out:

Question 1. A Square within a Rectangle
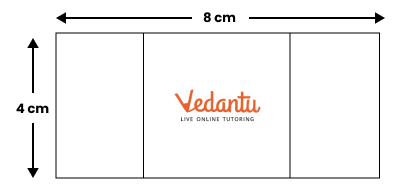
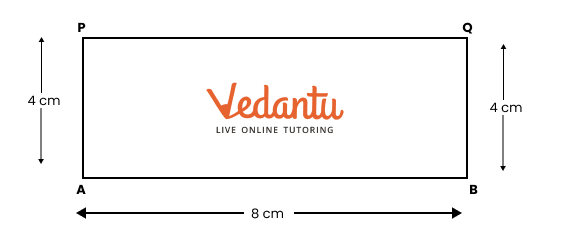
Construct a rectangle of sides 8 cm and 4 cm. How will you construct a square inside, as shown in the figure, such that the centre of the square is the same as the centre of the rectangle?


rectangle of sides 8 cm and 4 cm


Hint: Draw a rough figure. What will be the sidelength of the square? What will be the distance between the corners of the square and the outer rectangle?
Solution: The centre of a rectangle (or square) is the point of intersection of its diagonals.


Step 1. Using a ruler, draw a line AB equal to 8 cm. Using a protractor, draw perpendicular lines at A and B. Using a ruler, mark point P on the perpendicular line at A such that AP = 4 cm. Using a ruler, mark point Q on the perpendicular line at B such that BQ = 4 cm. Join P and Q using a ruler. Erase the lines above P and Q. (Fig. 1)


rectangle of sides 8 cm and 4 cm


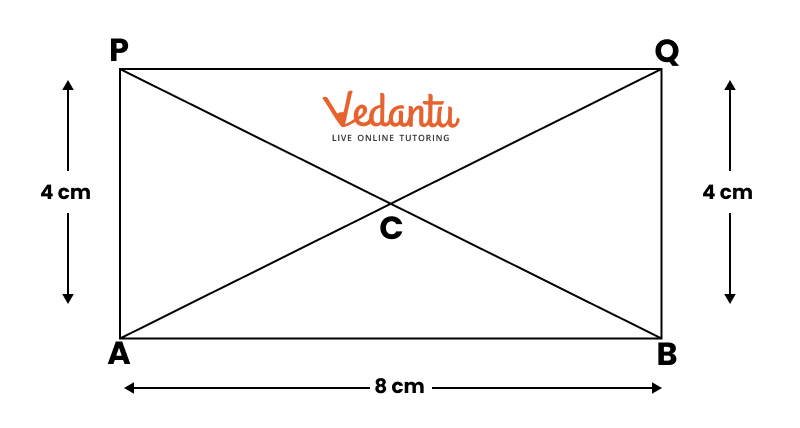
Step 2. Draw diagonals AQ and BP, using a ruler. Let the diagonals intersect at C. This point is the centre of the rectangle ABQP and of the required square. (Fig. 2)


diagonals in rectangle of sides 8 cm and 4 cm


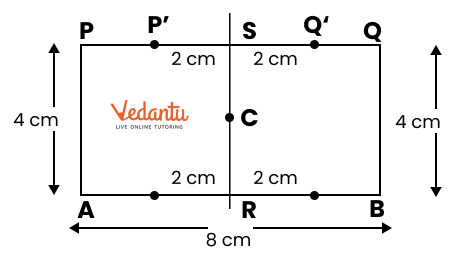
Step 3. Erase diagonals AQ and BP. Using a protractor, draw a perpendicular line on AB and pass through the centre C. Let this perpendicular meet AB at R and PQ at S. (Fig. 3).


dividing rectangle of sides 8 cm and 4 cm in 2 squares


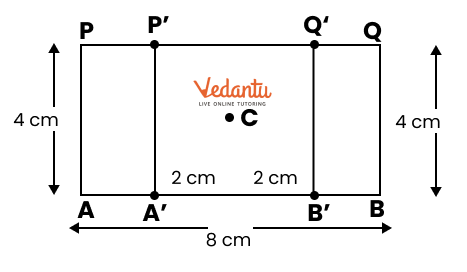
Step 4. Since AP = 4 cm, each side of the square must be 4 cm. Using a ruler, mark points A’ and B’ on AB such that A’R = 2 cm and RB’ = 2 cm. Thus, A’B’ = A’R + RB’ = 2 cm + 2 cm = 4 cm.


Similarly, using a ruler, mark points P’ and Q’ on PQ such that P’S = 2 cm and SQ’ = 2 cm. Thus, P’Q’ = P’S + SQ’ = 2 cm + 2 cm = 4 cm. (Fig. 4).


labelling in rectangle of sides 8 cm and 4 cm


Step 5. Using a ruler, join A’ and P’ and also B’ and Q’. Erase the line RS. (Fig. 5).


erasing line in rectangle of sides 8 cm and 4 cm


Step 6. In Fig. 5, A’B’Q’P’ is the required square with centre C, which is also the centre of the given rectangle.


Question 2. Falling Squares
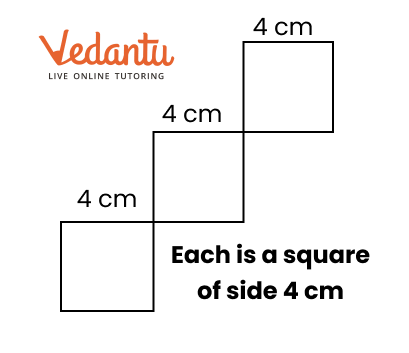
Construct the ‘Falling Squares” figure shown below:


each square of 4 cm


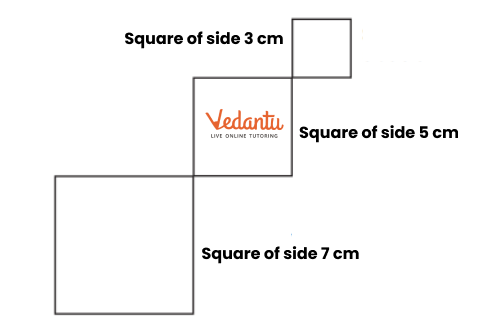
Make sure that the squares are aligned the way they are shown. Now, try this.


squares of sides 3cm, 5cm, and 7cm


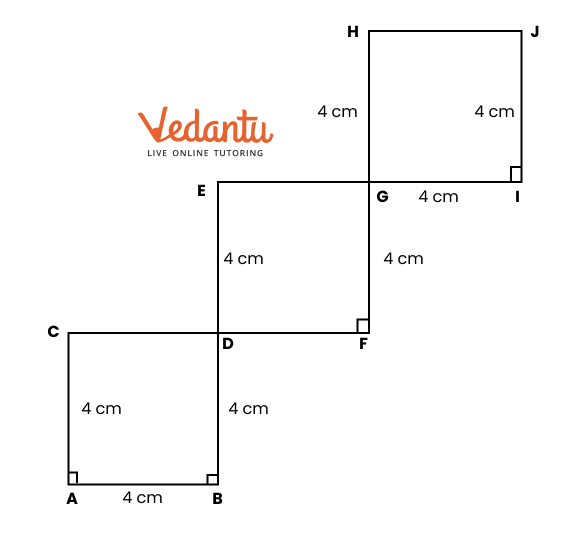
Solution: In the given figure, there are three falling squares and the side of each square is 4 cm.


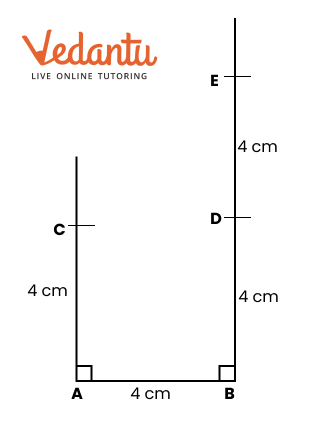
Step 1. Using a ruler, draw a line AB equal to 4 cm. Using a protractor, draw perpendicular lines at A and B.


Using a ruler, mark point C on a perpendicular line at A such that AC = 4 cm.


Using a ruler, mark points D and E on a perpendicular line at B such that BD = 4 cm and DE = 4 cm. (Fig. 1).


constructing squares of sides 3cm, 5cm, and 7cm


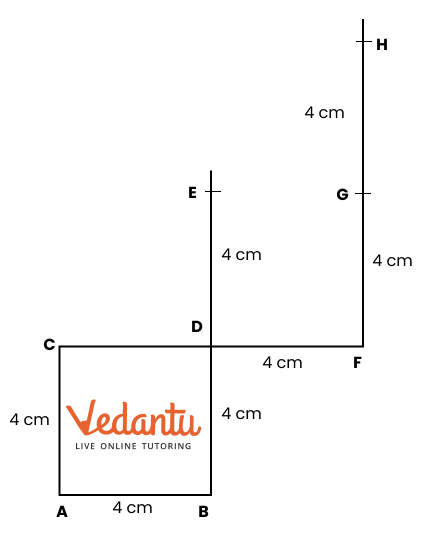
Step 2. Join C and D. Produce CD to F such that DF = 4 cm. Using a protractor, draw a perpendicular line at F. Using a ruler, mark points G and H on a perpendicular line at F such that FG = 4 cm and GH = 4 cm. (Fig. 2).


constructing squares of sides 3cm, 5cm, and 7cm


Step 3. Join E and G. Produce EG to I such that GE = 4 cm. Using a protractor, draw a perpendicular line at I. Using a ruler, mark point J on the perpendicular line at I such that IJ = 4 cm. Join H and J. Erase extra lines in the figure. (Fig. 3).


squares each of side 4 cm


Step 4. Fig. 3 is the required figure of three “falling squares” each of side 4 cm.

Question 3.


Shadings
Construct the figure given below. Choose the measurement of your choice. Note that the larger 4-sided figure is square and so tire the smaller ones.


Shadings


Solution:
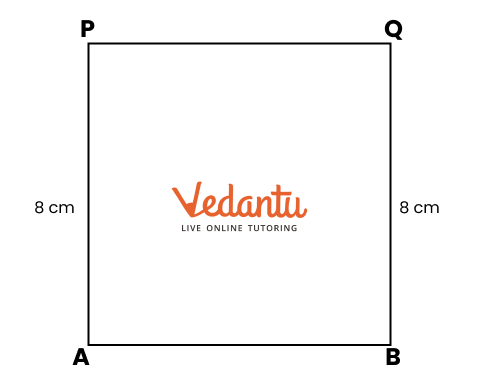
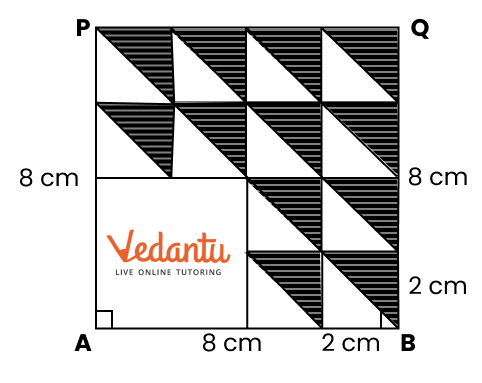
Step 1. Using a ruler, draw a line AB equal to 8 cm. Because, 8 ÷ 4 = 2, we shall draw smaller squares of side 2 cm. Using a protractor, draw perpendicular lines at A and B. Using a ruler, mark point P on the perpendicular line at A such that AP = 8 cm. Using a ruler, mark point Q on the perpendicular line at B such that BQ = 8 cm. Join P and Q using a ruler. Erase the lines above P and Q (Fig. 1).


square of side 8 cm


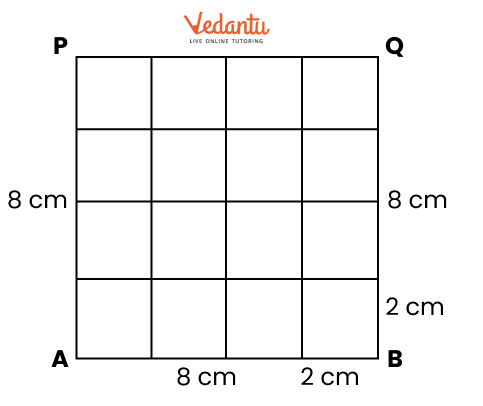
Step 2. On the lines AB, BQ, QP, and PA, mark points at distances of 2 cm, using a ruler. Draw horizontal lines and vertical lines to get 16 squares. (Fig. 2)


squares of side 2 cm inside in 8 cm square


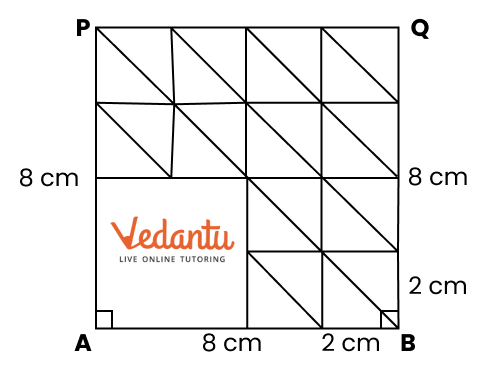
Step 3. From comer A, erase the inner sides of four squares to get a square of side 4 cm with one comer at A. Draw parallel diagonals of the remaining 12 small squares of side 2 cm each. (Fig. 3)


diagonals of 2 cm sqaures


Step 4. In the 12 small squares, draw horizontal lines in the portion above the diagonals. (Fig. 4)


shading in 2 cm squares


Step 5. Fig. 4 is the required figure having 12 small squares in a square.


Question 4. Square with a Hole


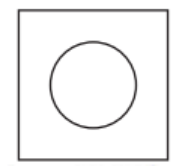
Square with a Hole


Observe that the circular hole is the same as the centre of the square.
Construct a “Square with a Hole” as shown in the given figure. The centre of the hole is the same as the centre of the square.
Hint: Think where the centre of the circle should be.
Solution: The centre of a square is the point of intersection of its diagonals. This centre is also the centre of the hole in the figure.


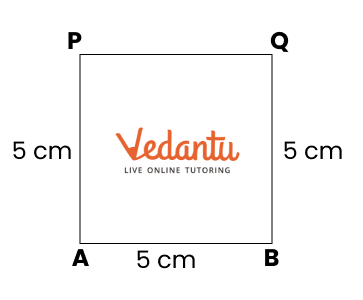
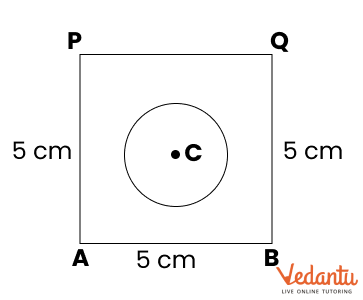
Step 1. Using a ruler, draw a line AB equal to 5 cm, say. Using a protractor, draw perpendicular lines at A and B. Using a ruler, mark point P on the perpendicular line at A such that AP = 5 cm. Using a ruler, mark point Q on the perpendicular line at B such that BQ = 5 cm. Join P and Q using a ruler. Erase the lines above P and Q (Fig. 1).


square of side 5 cm


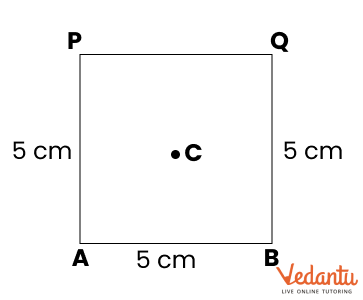
Step 2. Draw diagonals AQ and BP using a ruler. Let the diagonals intersect at C. This point is the centre of the square ABQP. Erase the diagonals AQ and BP. (Fig. 2).


square of side 5 cm with centre C


Step 3. With centre at C and a radius of 1.5 cm, say, draw a circle using a compass. (Fig. 3)


square of side 5 cm with a circle with centre C


Step 4. Fig. 3 is the required “Square with a Hole”.


Question 5. Square with more Holes
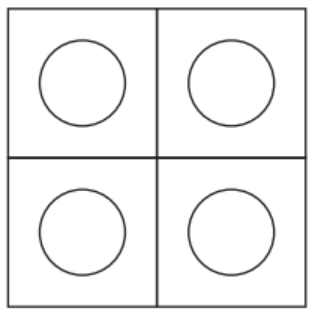
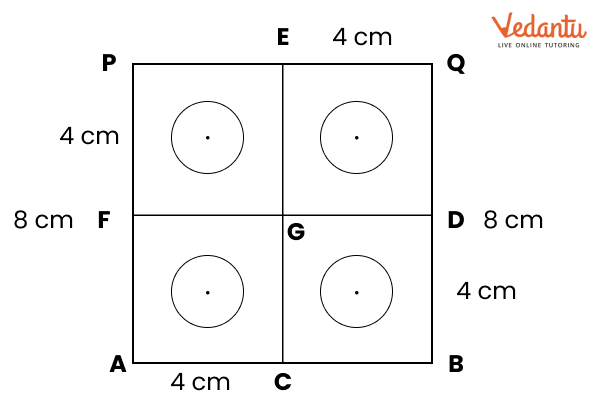
Construct a “Square with Four Holes” as shown in the given figure.


question image pf Square with Four Holes


Solution: In the figure, the centre of a circle is the same as that of the corresponding square.


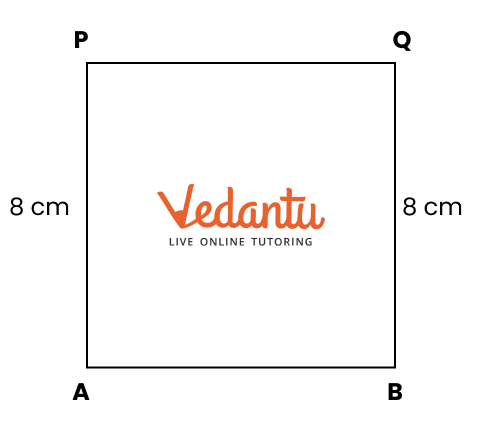
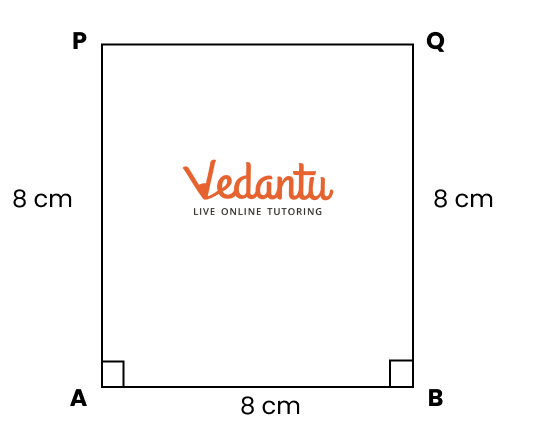
Step 1. Using a ruler, draw a line AB equal to 8 cm, say. Using a protractor, draw perpendicular lines at A and B. Using a ruler, mark point P on the perpendicular line at A such that AP = 8 cm. Using a ruler, mark point Q on the perpendicular line at B such that BQ = 8 cm. Join P and Q using a ruler. Erase the lines above P and Q. (Fig. 1)


square of side 8 cm


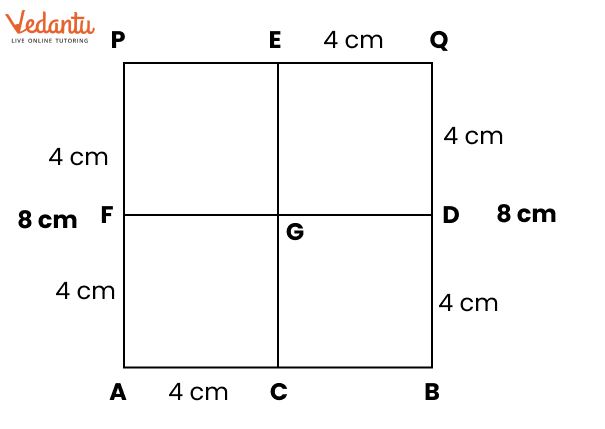
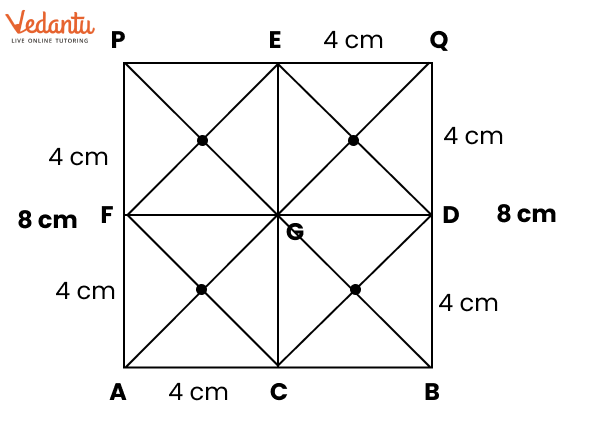
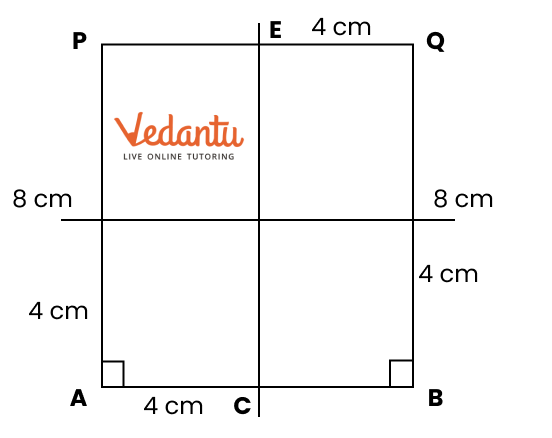
Step 2. Using a ruler, find points C, D, E, and F such that AC = 4 cm, BD = 4 cm, QE = 4 cm, and PF = 4 cm. Join C and E and also F and D. (Fig. 2)


four squares


Step 3. Let G be the intersection of lines FD and CE. Find the centres of squares ACGF, CBDG, DQEG, and GEPF by joining their respective diagonals. (Fig. 3)


constructing Square with Four Holes


Step 4. Erase the extra lines used for finding the centres of the smaller circles. With centre at centres of small squares, draw four circles of radius 1.3 cm, say. (Fig. 4)


Square with Four Holes


Step 5. Fig. 4 is the required “‘Square with Four Holes”.


Question 6. Square with Curves
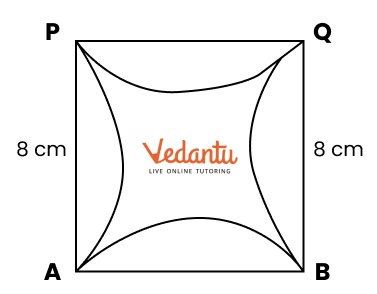
This is a square with 8 cm side lengths.


Square with Curves


Construct a “Square with Curves ”, taking a square of side 8 cm as shown in the figure.
Hint: Think where the tip of the compass can be placed to get all 4 arcs to bulge uniformly from each of the sides. Try it out!
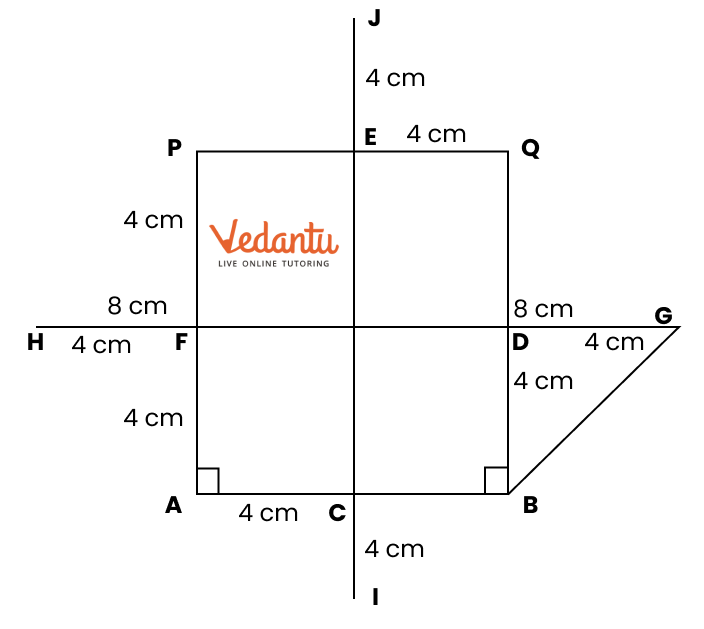
Solution: In the given figure, the centres of the four arcs are outside the square.


Step 1. Using a ruler, draw a line AB equal to 8 cm. Using a protractor, draw perpendicular lines at A and B. Using a ruler, mark point P on the perpendicular line at A such that AP = 8 cm. Using a ruler, mark point Q on the perpendicular line at B such that BQ = 8 cm. Join P and Q using a ruler. Erase the lines above P and Q. (Fig. 1)


square of side 8cm


Step 2. Using a ruler, mark points C, D, E, and F such that AC = 4 cm, BD = 4 cm, QE = 4 cm, and PF = 4 cm. Join C and E and also D and F. Extend these lines outside the square. (Fig. 2)


four squares


Step 3. Extend DF and take points G and H on it so that DG and FH are equal to 4 cm. Extend CE and take points I and J on it so that Cl and EJ are equal to 4 cm. The distance 4 cm can be taken slightly less than or greater than 4 cm. Join B and G. (Fig. 3)


construction Square with Curves


Step 4. With centres at G, H, I, and J and a radius equal to BG, draw four arcs inside the square as shown in the given figure. Erase the extra lines. (Fig. 4).


Square with Curves


Step 5. Fig. 4 is the required “Square with Curves” with the square of side 8 cm.


Benefits of NCERT Solutions for Class 6 Maths Chapter 8 Exercise 8.4 Playing with Constructions

  • The solutions provide detailed explanations of geometric constructions, helping students grasp the fundamental concepts clearly.

  • Each construction problem is presented with step-by-step instructions, making it easier for students to follow and replicate the processes.

  • By practising geometric constructions, students develop practical skills in using a compass and ruler, which are essential tools in geometry.

  • The solutions are aligned with the CBSE Class 6 Maths syllabus, ensuring that all necessary topics related to constructions are covered comprehensively.

  • Regular practice with these solutions enhances students’ ability to approach and solve geometric problems effectively.

  • Engaging with constructions fosters spatial reasoning and visualisation skills, which are important in mathematics and real-life applications.


Class 6 Maths Chapter 8: Exercises Breakdown

Class 6 Maths Chapter 1: Exercises

Exercise 8.1

Artwork

Exercise 8.2

Squares and Rectangles

Exercise 8.3

Constructing Squares and Rectangles

Exercise 8.5

Exploring Diagonals of Rectangles and Squares

Exercise 8.6

Points Equidistant from Two Given Points


Important Study Material Links for Class 6 Maths Chapter 8 - Playing with Constructions

S. No

Study Material Links for Chapter 8 Playing with Constructions

1.

Class 6 Maths Playing with Constructions Important Questions

2.

Class 6 Maths Playing with Constructions Revision Notes

3.

Class 6 Maths Playing with Constructions Worksheets


Conclusion

The NCERT Solutions for Class 6 Maths Chapter 8 Exercise 8.4, Playing with Constructions, are an invaluable resource for students seeking to master geometric constructions. With clear, step-by-step guidance and practical applications, these solutions enhance understanding and confidence in using essential tools like a compass and ruler. Aligned with the CBSE syllabus, they provide comprehensive coverage of the necessary concepts, preparing students for more advanced topics in geometry. The availability of FREE PDF downloads ensures easy access for effective study and revision. Overall, these solutions empower students to develop strong foundational skills in geometry, paving the way for future mathematical success.


Chapter-Specific NCERT Solutions for Class 6 Maths

The chapter-wise NCERT Solutions for Class 6 Maths are given below. Go through these chapter-wise solutions to be thoroughly familiar with the concepts.


Related Important Links for Maths Class 6

Along with this, students can also download additional study materials provided by Vedantu for Maths Class 6.


FAQs on NCERT Solutions for Class 6 Maths Chapter 8 Playing With Constructions Ex 8.4

1. What is covered in Class 6 Chapter 8 Exercise 8.4?

Exercise 8.4 focuses on basic geometric constructions, including the construction of angles and lines.

2. How can I access the Class 6 Chapter 8 Exercise 8.4 NCERT Solutions?

The solutions are available for free download in PDF format, easily accessible online on Vedantu’s website.

3. What are the benefits of using NCERT Solutions for Exercise 8.4?

These solutions provide clear, step-by-step guidance, helping students understand geometric constructions effectively.

4. Are diagrams included in the NCERT Solutions for Exercise 8.4?

Yes, the solutions feature diagrams to assist students in visualizing the construction processes.

5. How do NCERT Solutions help with exam preparation for Exercise 8.4?

The solutions align with the NCERT syllabus, ensuring that students study relevant material and practice key concepts.

6. What tools are needed for the constructions in Exercise 8.4?

Students will need a compass, a straightedge (ruler), and a pencil to perform the constructions accurately.

7. Can I use the NCERT Solutions for independent study?

Yes, the solutions are designed to support independent learning, allowing students to practice and understand the concepts on their own.

8. How often should I practice with the NCERT Solutions for Exercise 8.4?

Regular practice is recommended to reinforce understanding and improve skills in geometric constructions.

9. What skills will I develop by working through Exercise 8.4?

Students will enhance their skills in drawing, measuring, and applying geometric concepts through practice.

10. Is there a specific format for the NCERT Solutions PDF?

The PDF format is user-friendly, containing organised solutions, diagrams, and clear explanations for each problem in Exercise 8.4.