What is the zero error positive?
Answer
586.5k+ views
Hint: Solution lies in the vernier calipers. Vernier calipers are widely used in laboratory(physics) to determine the diameter of things. The vernier calipers are having main scale and the vernier. There are two types of zero error when it indicates behind the zero position then negative zero error and opposite when indicated on the other side of zero.
Complete step-by-step answer:
Before we proceed to the solution it is important to know about the zero error and their two types.
There are two types or error
Zero error positive
Zero error negative
Zero error positive: Positive zero error refers to the case when the jaws of the vernier caliper are just closed and the reading is a positive reading away from the actual reading of 0.00 mm. If the reading is 0.10 mm, the zero error is referred to as +0.10 mm.

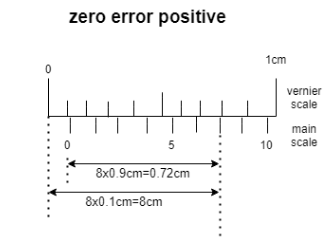
Here in the diagram we can see that zero error positive is shown. Whenever the scale reading is on the positive side of the zero of the main scale zero error positive occurs. Error because the vernier scale is not in the equal position of main scale. For example in the given diagram
Zero error = 0.8−0.72 =+0.08cm
Additional Information:
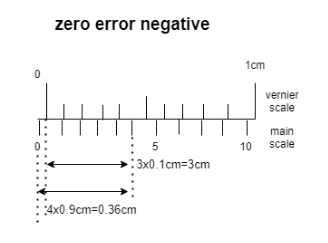
Zero error negative: Negative zero error refers to the case when the jaws of the vernier caliper are just closed and the reading is a negative reading away from the actual reading of 0.00 mm. If the reading is 0.08 mm, the zero error is referred to as -0.08 mm. For example in the given diagram
Zero error =-(0.36-0.3)cm which is equal to -0.06cm

Note: Vernier is a secondary scale used for extra precision. It was invented in 1631 by French mathematician Pierre vernier.
Vernier scale is used for calculating Internal, External Diameter of an object and depth or height of an object.
Least Count of Vernier caliper is 0.01cm
The Vernier calipers are extremely precise measuring instruments and the reading error is 0.05mm. The main sources of error include scale misleading or parallax effect, excessive measuring force causing jaw tilt, thermal expansions caused by temperature difference between caliper and work piece, and small hole diameter error caused by inside jaw offset.
Complete step-by-step answer:
Before we proceed to the solution it is important to know about the zero error and their two types.
There are two types or error
Zero error positive
Zero error negative
Zero error positive: Positive zero error refers to the case when the jaws of the vernier caliper are just closed and the reading is a positive reading away from the actual reading of 0.00 mm. If the reading is 0.10 mm, the zero error is referred to as +0.10 mm.

Here in the diagram we can see that zero error positive is shown. Whenever the scale reading is on the positive side of the zero of the main scale zero error positive occurs. Error because the vernier scale is not in the equal position of main scale. For example in the given diagram
Zero error = 0.8−0.72 =+0.08cm
Additional Information:
Zero error negative: Negative zero error refers to the case when the jaws of the vernier caliper are just closed and the reading is a negative reading away from the actual reading of 0.00 mm. If the reading is 0.08 mm, the zero error is referred to as -0.08 mm. For example in the given diagram
Zero error =-(0.36-0.3)cm which is equal to -0.06cm

Note: Vernier is a secondary scale used for extra precision. It was invented in 1631 by French mathematician Pierre vernier.
Vernier scale is used for calculating Internal, External Diameter of an object and depth or height of an object.
Least Count of Vernier caliper is 0.01cm
The Vernier calipers are extremely precise measuring instruments and the reading error is 0.05mm. The main sources of error include scale misleading or parallax effect, excessive measuring force causing jaw tilt, thermal expansions caused by temperature difference between caliper and work piece, and small hole diameter error caused by inside jaw offset.
Recently Updated Pages
Master Class 9 General Knowledge: Engaging Questions & Answers for Success

Master Class 9 Social Science: Engaging Questions & Answers for Success

Master Class 9 English: Engaging Questions & Answers for Success

Master Class 9 Maths: Engaging Questions & Answers for Success

Master Class 9 Science: Engaging Questions & Answers for Success

Class 9 Question and Answer - Your Ultimate Solutions Guide

Trending doubts
Difference Between Plant Cell and Animal Cell

Fill the blanks with the suitable prepositions 1 The class 9 english CBSE

Who is eligible for RTE class 9 social science CBSE

Which places in India experience sunrise first and class 9 social science CBSE

What is pollution? How many types of pollution? Define it

Name 10 Living and Non living things class 9 biology CBSE


