


How do you apply the correction due to zero error?
Answer
530.4k+ views
Hint: Zero errors are errors that occur when the primary marking on the instruments like micrometre screw gauge, Vernier calliper et cetera do not coincide with the zero marking of the instrument. These errors can cause serious issues in the accuracy of the measurement and readings. Thus, they need to be corrected by taking the appropriate steps. We first begin by calculating the zero error in the instrument and then adding or subtracting it from the calculated value to get the accurate measurement.
Complete step by step solution:
We shall see zero error with respect to the Vernier calliper to understand the correction properly.
1. Vernier Calliper:
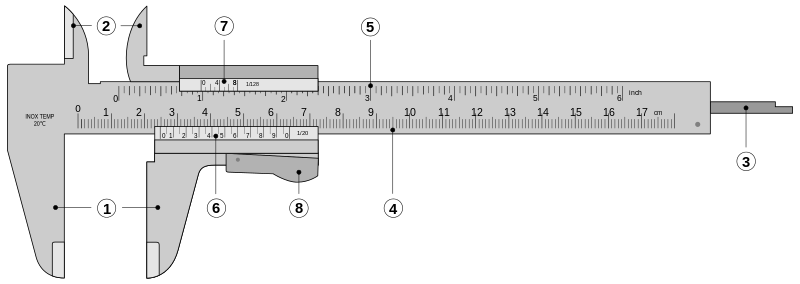
A Vernier calliper is an instrument used for making very accurate linear measurements. It utilises two graduated auxiliary scales to provide the measurement: a main scale similar to a regular ruler and an even further graduated scale, the Vernier that slides parallel to the main scale.
When there is no zero error, the main scale zero coincides with Vernier scale zero when there is no space between the blades. There can be two kinds of error if it doesn’t coincide: positive or negative.
i. Positive error: occurs when the jaws are touching each other and the zero of the Vernier lies on the right of the zero of the main scale.
To fix such an error, you subtract the zero error from the measured length to get the actual length as the measured length is greater than the actual length.
For example, if the zero error is a positive and the calculated length then,
Actual length $ = 1.5 - 0.3mm = 1.2mm$
ii. Negative error: similarly, when the jaws are touching each other and the zero of the Vernier calliper lies on the left of the zero of the main scale, a negative error is said to occur.
In such cases, the magnitude of the error is added to the calculated value to get the actual length as the actual length is greater than the calculated length.
For example, if the zero error is a positive and the calculated length then,
Actual length $ = 1.5 + 0.3mm = 1.8mm$
So depending on the kind of error, you either subtract or add the magnitude of the error to the calculated value. This can be done for other instruments too.
Note: Always make sure that the jaws of the instruments are completely shut before measuring the zero error. Different instruments have different ways to find the zero error, but the concept behind correction of the zero error is the same.
Complete step by step solution:
We shall see zero error with respect to the Vernier calliper to understand the correction properly.
1. Vernier Calliper:
A Vernier calliper is an instrument used for making very accurate linear measurements. It utilises two graduated auxiliary scales to provide the measurement: a main scale similar to a regular ruler and an even further graduated scale, the Vernier that slides parallel to the main scale.
When there is no zero error, the main scale zero coincides with Vernier scale zero when there is no space between the blades. There can be two kinds of error if it doesn’t coincide: positive or negative.
i. Positive error: occurs when the jaws are touching each other and the zero of the Vernier lies on the right of the zero of the main scale.
To fix such an error, you subtract the zero error from the measured length to get the actual length as the measured length is greater than the actual length.
For example, if the zero error is a positive and the calculated length then,
Actual length $ = 1.5 - 0.3mm = 1.2mm$
ii. Negative error: similarly, when the jaws are touching each other and the zero of the Vernier calliper lies on the left of the zero of the main scale, a negative error is said to occur.
In such cases, the magnitude of the error is added to the calculated value to get the actual length as the actual length is greater than the calculated length.
For example, if the zero error is a positive and the calculated length then,
Actual length $ = 1.5 + 0.3mm = 1.8mm$
So depending on the kind of error, you either subtract or add the magnitude of the error to the calculated value. This can be done for other instruments too.
Note: Always make sure that the jaws of the instruments are completely shut before measuring the zero error. Different instruments have different ways to find the zero error, but the concept behind correction of the zero error is the same.
Recently Updated Pages
JEE Main 2023 April 6 Shift 1 Question Paper with Answer Key
JEE Main 2023 April 6 Shift 2 Question Paper with Answer Key
JEE Main 2023 (January 31 Evening Shift) Question Paper with Solutions [PDF]
JEE Main 2023 January 30 Shift 2 Question Paper with Answer Key
JEE Main 2023 January 25 Shift 1 Question Paper with Answer Key
JEE Main 2023 January 24 Shift 2 Question Paper with Answer Key
Trending doubts
JEE Main 2026: Session 2 Registration Open, City Intimation Slip, Exam Dates, Syllabus & Eligibility
JEE Main 2026 Application Login: Direct Link, Registration, Form Fill, and Steps
Understanding the Angle of Deviation in a Prism
Hybridisation in Chemistry – Concept, Types & Applications
How to Convert a Galvanometer into an Ammeter or Voltmeter
Understanding Uniform Acceleration in Physics
Other Pages
JEE Advanced Marks vs Ranks 2025: Understanding Category-wise Qualifying Marks and Previous Year Cut-offs
Laws of Motion Class 11 Physics Chapter 4 CBSE Notes - 2025-26
Waves Class 11 Physics Chapter 14 CBSE Notes - 2025-26
Mechanical Properties of Fluids Class 11 Physics Chapter 9 CBSE Notes - 2025-26
Thermodynamics Class 11 Physics Chapter 11 CBSE Notes - 2025-26
Units And Measurements Class 11 Physics Chapter 1 CBSE Notes - 2025-26